
Monitor monthly bandwidth in zabbix


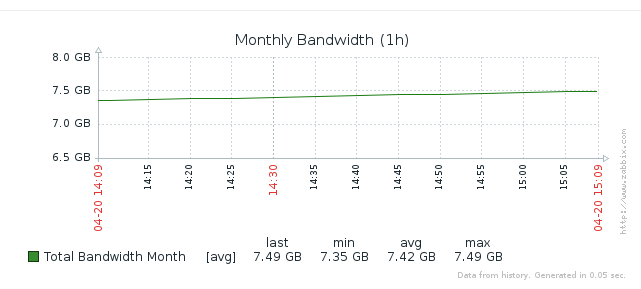
Monitoring server's used bandwidth is not something that comes integrated with Zabbix by default.

First of all we deploy vnstat to the target server(s).  vnstat is a simple program to monitor network traffic:

[root@test-ashok ~]# yum install vnstat -y
[root@test-ashok ~]# vnstat -u -i ens160   (interface name)
[root@test-ashok ~]#  sudo chown -R vnstat: /var/lib/vnstat
[root@test-ashok ~]# sudo systemctl start vnstat
[root@test-ashok ~]# sudo systemctl enable vnstat

root@test-ashok ~]# vnstat -m

 eth0  /  monthly

       month        rx      |     tx      |    total    |   avg. rate
    ------------------------+-------------+-------------+---------------
      Apr '18      5.00 GiB |    2.46 GiB |    7.46 GiB |   36.93 kbit/s
    ------------------------+-------------+-------------+---------------
    estimated      7.65 GiB |    3.76 GiB |   11.41 GiB |

Now we need to add small bash script for user parameter for zabbix.

#!/bin/bash
# Current month total bandwidth in MB

i=$(vnstat --oneline | awk -F\; '{ print $11 }')

bandwidth_number=$(echo $i | awk '{ print $1 }')

bandwidth_unit=$(echo $i | awk '{ print $2 }')

case "$bandwidth_unit" in
    KiB)    bandwidth_number_MB=$(echo "$bandwidth_number/1024" | bc)
            echo $bandwidth_number_MB
        ;;
    MiB)    bandwidth_number_MB=$bandwidth_number
        ;;
    GiB)     bandwidth_number_MB=$(echo "$bandwidth_number*1024" | bc)
        ;;
    TiB)    bandwidth_number_MB=$(echo "$bandwidth_number*1024*1024" | bc)
        ;;
    esac
echo $bandwidth_number_MB

save this file as "monthlybandwidth.sh" in "/usr/lib/zabbix/externalscripts ".

change permissions to 755.

[root@test-ashok ~]# chmod 755 monthlybandwidth.sh

after this step we need to check the script is working by ./monthlybandwidth.sh

In agent cnfiguration file add this

UserParameter=system.monthlybandwidth,/usr/lib/zabbix/externalscripts/monthlybandwidth.sh

then we complted configuration with server end.


in zabbix frontend add below template to the host.

https://drive.google.com/open?id=1oM1TJju5DGSOrJIpwRLATzJoZU6d9JGj


Comments

  1. Hi, its great your script only a notice something, when you reach the 1 TB dont show like TB on Zabbix, show like 1 KGB

    ReplyDelete

Post a Comment

Popular posts from this blog

How to remove zabbix-agent from Ubuntu 16.04 (Xenial Xerus)

Uninstall zabbix-agent To remove just zabbix-agent package itself from Ubuntu 16.04 (Xenial Xerus) execute on terminal: sudo apt-get remove zabbix-agent Uninstall zabbix-agent and it's dependent packages To remove the zabbix-agent package and any other dependant package which are no longer needed from Ubuntu Xenial. sudo apt-get remove --auto-remove zabbix-agent Purging zabbix-agent If you also want to delete configuration and/or data files of zabbix-agent from Ubuntu Xenial then this will work: sudo apt-get purge zabbix-agent To delete configuration and/or data files of zabbix-agent and it's dependencies from Ubuntu Xenial then execute: sudo apt-get purge --auto-remove zabbix-agent

Install Zabbix Agent on Suse Linux and Configure

Install taken from Suse –  http://software.opensuse.org/download/package?project=server:monitoring&package=zabbix-agent For SLE 12 SP1 run the following as root : zypper addrepo http://download.opensuse.org/repositories/server:monitoring/SLE_12_SP1/server:monitoring.repo zypper refresh zypper install zabbix-agent For SLE 12 run the following as root : zypper addrepo http://download.opensuse.org/repositories/server:monitoring/SLE_12/server:monitoring.repo zypper refresh zypper install zabbix-agent For SLE 11 SP4 run the following as root : zypper addrepo http://download.opensuse.org/repositories/server:monitoring/SLE_11_SP4/server:monitoring.repo zypper refresh zypper install zabbix-agent For SLE 11 SP3 run the following as root : zypper addrepo http://download.opensuse.org/repositories/server:monitoring/SLE_11_SP3/server:monitoring.repo zypper refresh zypper install zabbix-agent To configure the agent – Instructions taken from – https://www.zabbix.org/wiki

Zabbix alert Notification with Telegram

Zabbix Notifications with graphs in Telegram. Features  Graphs based on latest data are sent directly to your messenger  You can send messages both in private and group chats  Channels support  Saves chatid as a temporary file  Simple markdown and HTML are supported  Emoji in messages First of all : Nedd to install python (>3) on Cent os  # yum -y install python-pip # yum install -y https://centos7.iuscommunity.org/ius-release.rpm #  yum install -y python34u python34u-libs python34u-devel python34u-pi # yum -y install python-pip You need to install the  requests  module for python, this is required for operation! # pip install requests Put  zbxtg.py  in your  AlertScriptsPath  directory, the path is set inside your zabbix_server.conf (once confirm by zabbix server conf file ) Link to download ZBXTG.PY file  https://drive.google.com/open?id=0BxB8j19aCMZ8dFl1aHVuLVJyRjQ # cp zbxtg.py /usr/local/share/zabbix/alertscripts/ Create