vPoller Integration With Zabbix
One of the nice things about vPoller is that it can be easily integrated with other systems.In this documentation we will see how we can integrate vPoller with Zabbix in order to start monitoring our VMware vSphere environment.
Note
This document is about VMware monitoring with vPoller and
Zabbix, and NOT about VMware monitoring with stock Zabbix.
If you are looking for VMware monitoring with stock Zabbix,
please refer to the official Zabbix documentation.
Why use vPoller with Zabbix and not just use stock Zabbix for VMware monitoring?
There are many things that can be put here describing the reasons and motivation why you might prefer having vPoller with Zabbix integration instead of stock Zabbix, but eventually this would end up being one long (and probably boring) story to write and tell.You can read this post here, which outlines some very good reasons why you might want to have vPoller with Zabbix instead of stock Zabbix when it comes to VMware vSphere monitoring.
Prerequisites
This documentation assumes that you already have Zabbix installed and configured.Next thing you need to make sure is that you have vPoller installed, configured and already running.
If you haven’t installed and configured vPoller yet, please refer to the Installation of vPoller and Configuration of vPoller documentations first.
Enabling the vPoller Helpers for Zabbix
In order to be able to integrate vPoller with Zabbix we need to enable some of the vPoller helpers first.Make sure that these vPoller helpers are enabled in your
vPoller Workers:- vpoller.helpers.zabbix
- vpoller.helpers.czabbix
vPoller Workers, please refer to the vPoller Helpers documentation.Importing the vPoller templates in Zabbix
You can grab the latest vPoller templates for Zabbix from the Github repo of vPoller.
Note
Some of the Zabbix items from the vPoller templates are disabled
by default. It is recommended that you review each vPoller
template and enable or disable the items that you need or
don’t need at all.
- vpoller-templates-externalchecks - contains legacy templates to be used only with Zabbix external scripts
- vpoller-templates-native - contains the templates with native vPoller support for Zabbix. It is recommended that you always use the native vPoller support for Zabbix.
- vpoller-templates-native-2.4 - same as the vpoller-templates-native templates, but for Zabbix 2.4.x releases.

Native vPoller support for Zabbix
Native vPoller support for Zabbix makes it possible for Zabbix to talk natively to vPoller via a Zabbix loadable moduleNative vPoller support for Zabbix is available only for Zabbix release versions 2.2.x or above, as loadable modules in Zabbix were introduced since the 2.2.x release of Zabbix.
Now, let’s see how to build, install and configure the vPoller loadable module for Zabbix.
First, make sure that you have the ZeroMQ 4.x library installed as the vPoller loadable module for Zabbix is linked against it.
Here is how to install the ZeroMQ 4.x library on your system from source:
$ git clone https://github.com/zeromq/zeromq4-x.git
$ cd zeromq4-x
$ ./autogen.sh
$ ./configure
$ make && sudo make install && make clean
$ sudo ldconfig
Get the source package for your Zabbix release. For instance if you are running Zabbix version 2.2.5 you should download the source package for version 2.2.5 of Zabbix.
In the example commands below we are using the source package for Zabbix version 2.2.5.
$ tar zxvf zabbix-2.2.5.tar.gz
$ cd zabbix-2.2.5
$ ./configure
zabbix-2.2.5/src/modules directory where you have unpacked the
Zabbix source package.$ cp -a py-vpoller/extra/zabbix/vpoller-module zabbix-2.2.5/src/modules
$ cd zabbix-2.2.5/src/modules/vpoller-module
$ make
make(1) command will create the shared library
vpoller.so, which can now be loaded by your Zabbix Server,
Proxy and Agents.Let’s now load the
vpoller.so module in the Zabbix Server during
startup. In order to load the module you need to edit your
zabbix_server.conf file and update the LoadModulePath and
LoadModule configuration options. Below is an example snippet
from the zabbix_server.conf file, which loads the vpoller.so
module.####### LOADABLE MODULES #######
### Option: LoadModulePath
# Full path to location of server modules.
# Default depends on compilation options.
#
# Mandatory: no
# Default:
LoadModulePath=/usr/local/lib/zabbix
### Option: LoadModule
# Module to load at server startup. Modules are used to extend functionality of the server.
# Format: LoadModule=<module.so>
# The modules must be located in directory specified by LoadModulePath.
# It is allowed to include multiple LoadModule parameters.
#
# Mandatory: no
# Default:
LoadModule=vpoller.so
vpoller.so module, which you’ve built
to your LoadModulePath directory.$ sudo cp zabbix-2.2.5/src/modules/vpoller-module/vpoller.so /usr/local/lib/zabbix
You can verify that the
vpoller.so module has been successfully
loaded by inspecting your Zabbix logs. In the log snippet below
you can see that our Zabbix Server has successfully loaded
the vpoller.so module.13352:20140910:080628.011 Starting Zabbix Server. Zabbix 2.2.5 (revision 47411).
13352:20140910:080628.012 ****** Enabled features ******
13352:20140910:080628.012 SNMP monitoring: YES
13352:20140910:080628.012 IPMI monitoring: YES
13352:20140910:080628.012 WEB monitoring: YES
13352:20140910:080628.012 VMware monitoring: YES
13352:20140910:080628.012 Jabber notifications: YES
13352:20140910:080628.012 Ez Texting notifications: YES
13352:20140910:080628.012 ODBC: YES
13352:20140910:080628.012 SSH2 support: YES
13352:20140910:080628.012 IPv6 support: YES
13352:20140910:080628.012 ******************************
13352:20140910:080628.012 using configuration file: /etc/zabbix/zabbix_server.conf
13352:20140910:080628.013 Loading vPoller module configuration file /etc/zabbix/vpoller_module.conf
13352:20140910:080628.015 loaded modules: vpoller.so
vPoller Proxy to which task requests are being sent.The configuration of the
vpoller.so module resides in the
/etc/zabbix/vpoller_module.conf file and you can find a sample
configuration file in the vPoller loadable module for Zabbix
directory from the Github repo.The Zabbix vPoller Key
Once loaded the vPoller module for Zabbix exposes a single key of typeSimple check that can be used by your Zabbix items and is
called vpoller[*].The
vpoller[*] Zabbix key has the following form:vpoller[method, hostname, name, properties, <key>, <username>, <password>, <counter-name>, <instance>, <perf-interval>]
vpoller[*] key expects are these.| Parameter | Description | Required |
|---|---|---|
| method | vPoller method to be processed | True |
| hostname | VMware vSphere server hostname | True |
| name | Name of the vSphere object (e.g. VM name, ESXi name) | True |
| properties | vSphere object properties to be collected by vPoller | True |
| <key> | Additional information to be passed to vPoller | False |
| <username> | Username to use when logging into the guest system | False |
| <password> | Password to use when logging into the guest system | False |
| <counter-name> | Performance counter name to be retrieved | False |
| <instance> | Performance counter instance | False |
| <perf-interval> | Historical performance interval | False |
If your Zabbix Agents are also loading the
vpoller.so module
you can use the zabbix_get(8) tool from the command-line in order
to send task requests to vPoller.Here is one example that uses
zabbix_get(8) in order check the
power state of VM using the vpoller[*] key.$ zabbix_get -s 127.0.0.1 -p 10050 -k "vpoller[vm.get, vc01.example.org, ns01.example.org, runtime.powerState]"
"poweredOn"
Setting up vPoller externalscripts for Zabbix
Note
This section of the documentation provides instructions
how to install the vPoller externalscripts in Zabbix.
It is recommended that you always use the
native vPoller support for Zabbix when integrating vPoller
with Zabbix, and use externalscripts only if you cannot
have the native vPoller support for Zabbix, e.g. you are
running an older Zabbix release which doesn’t support loadable
modules or the loadable module is not available for your platform.vpoller-zabbix and cvpoller-zabbix wrapper scripts
from the links below and place them in your Zabbix
externalscripts directory:- https://github.com/dnaeon/py-vpoller/blob/master/extra/zabbix/externalscripts/vpoller-zabbix
- https://github.com/dnaeon/py-vpoller/blob/master/extra/zabbix/externalscripts/cvpoller-zabbix
vpoller-zabbix and
cvpoller-zabbix wrapper scripts, which come with more features
and safety checks at the links below:- https://github.com/dnaeon/py-vpoller/blob/master/contrib/zabbix/externalscripts/vpoller-zabbix
- https://github.com/dnaeon/py-vpoller/blob/master/contrib/zabbix/externalscripts/cvpoller-zabbix
Place the
vpoller-zabbix and cvpoller-zabbix wrapper scripts
into your Zabbix externalscripts directory and make sure they
are executable as well:$ sudo chmod 0755 $externalscripts/vpoller-zabbix $externalscripts/cvpoller-zabbix
Monitoring your VMware environment with vPoller and Zabbix
Time to start monitoring our VMware vSphere environment with vPoller and Zabbix. Let’s go ahead and add a VMware vCenter server and get some data out of it.Login to your Zabbix frontend and navigate to
Configuration -> Hosts, then at the top-right corner click on the
Create host button. Fill in the hostname of the vCenter we are
going to monitor and add it to a group, e.g. vCenters in my case.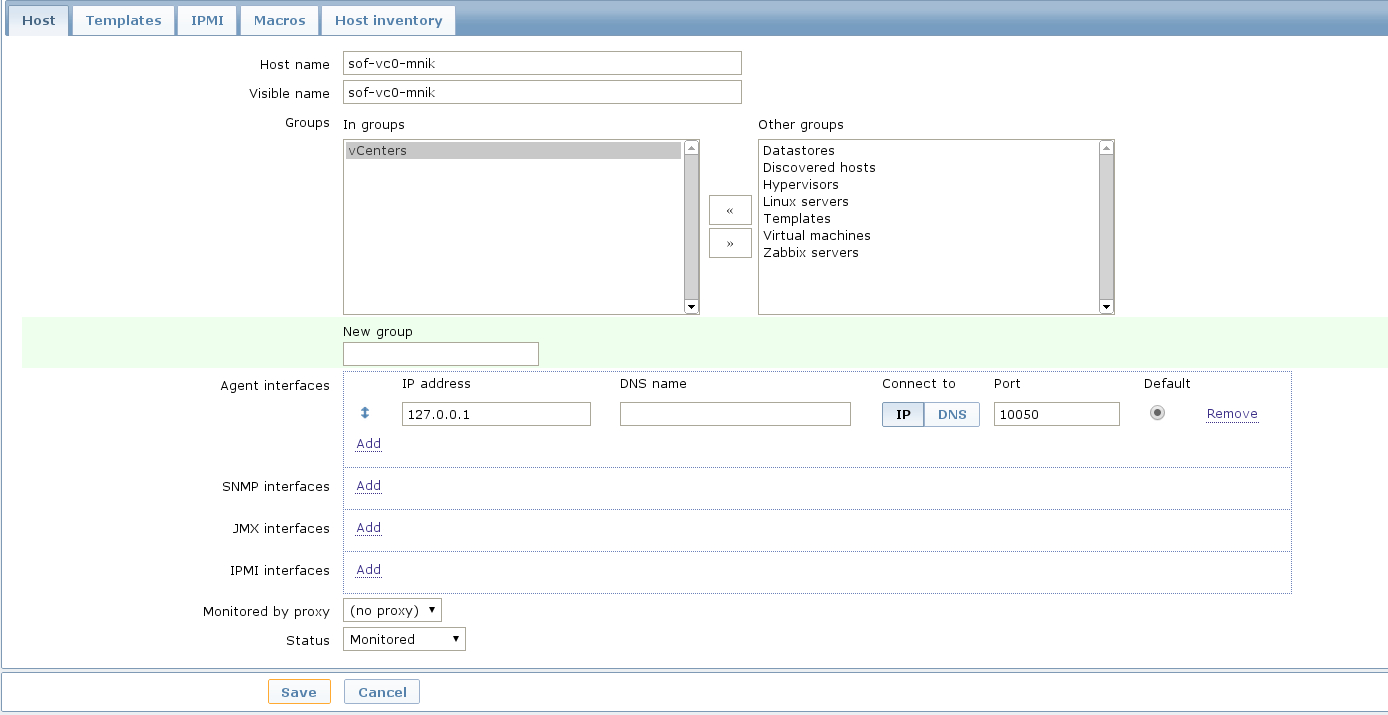 Next, click on the
 Templates and link the
Template VMware vSphere - vPoller template if you are using
vPoller with external checks support or use the
Template VMware vSphere - vPoller Native template for native
vPoller support in Zabbix. The last thing we need to do is add a Zabbix macro to our
vSphere host. Navigate to the
 Macros tab and add the
{$VSPHERE.HOST} macro which value should be the hostname of the
vSphere host you are adding to Zabbix. Once done, click the
 Save button and you are ready.Soon enough Zabbix will start sending requests to vPoller which would discover your vSphere objects (ESXi hosts, Virtual Machines, Datastores, etc) and start monitoring them.
Importing vSphere objects as regular Zabbix hosts
In the previous section of this documentation we have seen how we can use Zabbix with vPoller working together in order to perform monitoring of our VMware vSphere environment.The way we did it is by using vPoller in order to discover VMware vSphere objects and then use the Zabbix Low-level discovery protocol in order to create hosts based on the discovered data.
While
Zabbix Low-level discovery is a powerful feature of Zabbix
which you could use in order to automate the process of discovering
and adding hosts to your Zabbix server, it still has some limitations
and disadvantages.One disadvantage of using Zabbix LLD is that once a host is being created by a Zabbix Discovery Rule that host becomes immutable - you cannot manually change or update anything on the host, unless these changes come from the discovery rule or the host profile applied to the host.
You can imagine that this might be a bit of frustrating when you want to group your hosts in a better way for example, which obviously you cannot do since this host is now immutable.
Linking additional templates to a discovered host is also not possible, which is another big issue. Now that you’ve discovered your VMware Virtual Machines you probably wanted to link some additional templates to them, but you will soon discover that this is not possible either.
You cannot even add more interfaces to your hosts if needed... Like mentioned earlier - your host is immutable, so that means no changes at all after your hosts have been discovered with a Zabbix LLD rule.
So, what can we do about it?
Well, we can solve this issue! And vPoller is going to help us do that! :)
We are going to use the zabbix-vsphere-import tool, which can discover and import vSphere objects as regular Zabbix hosts - that means that all vSphere objects (ESXi hosts, Virtual Machines, Datastores, etc.) which were imported by the zabbix-vsphere-import tool would be regular Zabbix hosts, which you could update - adding the host to groups you want, linking arbitrary templates to it, etc.
First, let’s create the config file which zabbix-vsphere-import will be using. Below is an example config file used by
zabbix-vsphere-import tool:---
vsphere:
hostname: vc01.example.org
vpoller:
endpoint: tcp://localhost:10123
retries: 3
timeout: 3000
zabbix:
hostname: http://zabbix.example.org/zabbix
username: Admin
password: zabbix
vsphere_object_host:
proxy: zbx-proxy.example.org
templates:
- Template VMware vSphere Hypervisor - vPoller Native
macros:
VSPHERE.HOST: vc01.example.org
groups:
- Hypervisors
vsphere_object_vm:
templates:
- Template VMware vSphere Virtual Machine - vPoller Native
macros:
VSPHERE.HOST: vc01.example.org
groups:
- Virtual Machines
vsphere_object_datastore:
templates:
- Template VMware vSphere Datastore - vPoller Native
macros:
VSPHERE.HOST: vc01.example.org
groups:
- Datastores
As you can see the format of the configuration file allows for flexible setup of your discovered vSphere objects.
Time to import our vSphere objects as regular Zabbix hosts. To do that simply execute the command below:
$ zabbix-vsphere-import -f zabbix-vsphere-import.yaml
$ zabbix-vsphere-import -f zabbix-vsphere-import.yaml
[2014-09-06 10:33:28,420] - INFO - Connecting to Zabbix server at http://zabbix.example.org/zabbix
[2014-09-06 10:33:28,537] - INFO - [vSphere ClusterComputeResource] Importing objects to Zabbix
[2014-09-06 10:33:28,814] - INFO - [vSphere ClusterComputeResource] Number of objects to be imported: 1
[2014-09-06 10:33:28,814] - INFO - [vSphere ClusterComputeResource] Creating Zabbix host group 'cluster01'
[2014-09-06 10:33:28,904] - INFO - [vSphere ClusterComputeResource] Import of objects completed
[2014-09-06 10:33:28,904] - INFO - [vSphere HostSystem] Importing objects to Zabbix
[2014-09-06 10:33:29,122] - INFO - [vSphere HostSystem] Number of objects to be imported: 2
[2014-09-06 10:33:29,289] - INFO - [vSphere HostSystem] Creating Zabbix host 'esxi01.example.org'
[2014-09-06 10:33:30,204] - INFO - [vSphere HostSystem] Creating Zabbix host 'esxi02.example.org'
[2014-09-06 10:33:30,658] - INFO - [vSphere HostSystem] Import of objects completed
[2014-09-06 10:33:30,658] - INFO - [vSphere VirtualMachine] Importing objects to Zabbix
[2014-09-06 10:33:30,775] - INFO - [vSphere VirtualMachine] Number of objects to be imported: 9
[2014-09-06 10:33:30,935] - WARNING - Unable to find Zabbix host group 'Virtual Machines'
[2014-09-06 10:33:30,936] - INFO - Creating Zabbix host group 'Virtual Machines'
[2014-09-06 10:33:33,965] - INFO - [vSphere VirtualMachine] Creating Zabbix host 'ubuntu-14.04-dev'
[2014-09-06 10:33:34,956] - INFO - [vSphere VirtualMachine] Creating Zabbix host 'centos-6.5-amd64'
[2014-09-06 10:33:35,945] - INFO - [vSphere VirtualMachine] Creating Zabbix host 'sof-vc0-mnik'
[2014-09-06 10:33:36,441] - INFO - [vSphere VirtualMachine] Creating Zabbix host 'test-vm-01'
[2014-09-06 10:33:36,934] - INFO - [vSphere VirtualMachine] Creating Zabbix host 'sof-dev-d7-mnik'
[2014-09-06 10:33:37,432] - INFO - [vSphere VirtualMachine] Creating Zabbix host 'ubuntu-12.04-desktop'
[2014-09-06 10:33:43,430] - INFO - [vSphere VirtualMachine] Creating Zabbix host 'zabbix-vm-2'
[2014-09-06 10:33:43,929] - INFO - [vSphere VirtualMachine] Creating Zabbix host 'zabbix-vm-1'
[2014-09-06 10:33:44,432] - INFO - [vSphere VirtualMachine] Creating Zabbix host 'VMware vCenter Server Appliance'
[2014-09-06 10:33:44,937] - INFO - [vSphere VirtualMachine] Import of objects completed
[2014-09-06 10:33:44,937] - INFO - [vSphere Datastore] Importing objects to Zabbix
[2014-09-06 10:33:45,046] - INFO - [vSphere Datastore] Number of objects to be imported: 1
[2014-09-06 10:33:45,339] - INFO - [vSphere Datastore] Creating host 'ds:///vmfs/volumes/5190e2a7-d2b7c58e-b1e2-90b11c29079d/'
[2014-09-06 10:33:45,607] - INFO - [vSphere Datastore] Import of objects completed
cron(8)), so that your Zabbix server is in sync with
your vSphere environment.If you are importing your vSphere objects in Zabbix using the
zabbix-vsphere-import tool make sure to disable any
Zabbix LLD discovery rules in order to avoid any conflicts between
them.Agent-less process monitoring in Virtual Machines
Another cool feature of vPoller is the ability to perform process monitoring inside VMware Virtual Machines without the need of having Zabbix Agents (or any other software) installed and running on your systems.This can be quite handy in situations where you don’t have the Zabbix Agents installed or you are not even allowed to install any software on your Virtual Machines.
A good example is a service provider where customers request that specific process availability be monitored in Virtual Machines, but don’t want to have any third-party software installed on the customers’ systems.
In case you are wondering how we perform the agent-less process monitoring of VMware Virtual Machines using vPoller, you may want to check the vSphere API documentation for GuestProcessManager().
Let’s see now how we can use vPoller with Zabbix integration in order to provide agent-less process monitoring for our Virtual Machines.
First we will create a Zabbix item that will monitor the total number of processes in a Virtual Machine and then we will see how we can monitor the availability for certain processes.
The Zabbix key that we will use for agent-less process monitoring is of type
Simple check and has the following format:vpoller["vm.process.get", "{$VSPHERE.HOST}", "{HOST.HOST}", "cmdLine", "", username, password]
username and password parameters
should be a valid username and password that can login to the guest
system.On the screenshot below we are creating a new Zabbix item that will monitor the total number of processes in our Virtual Machine.
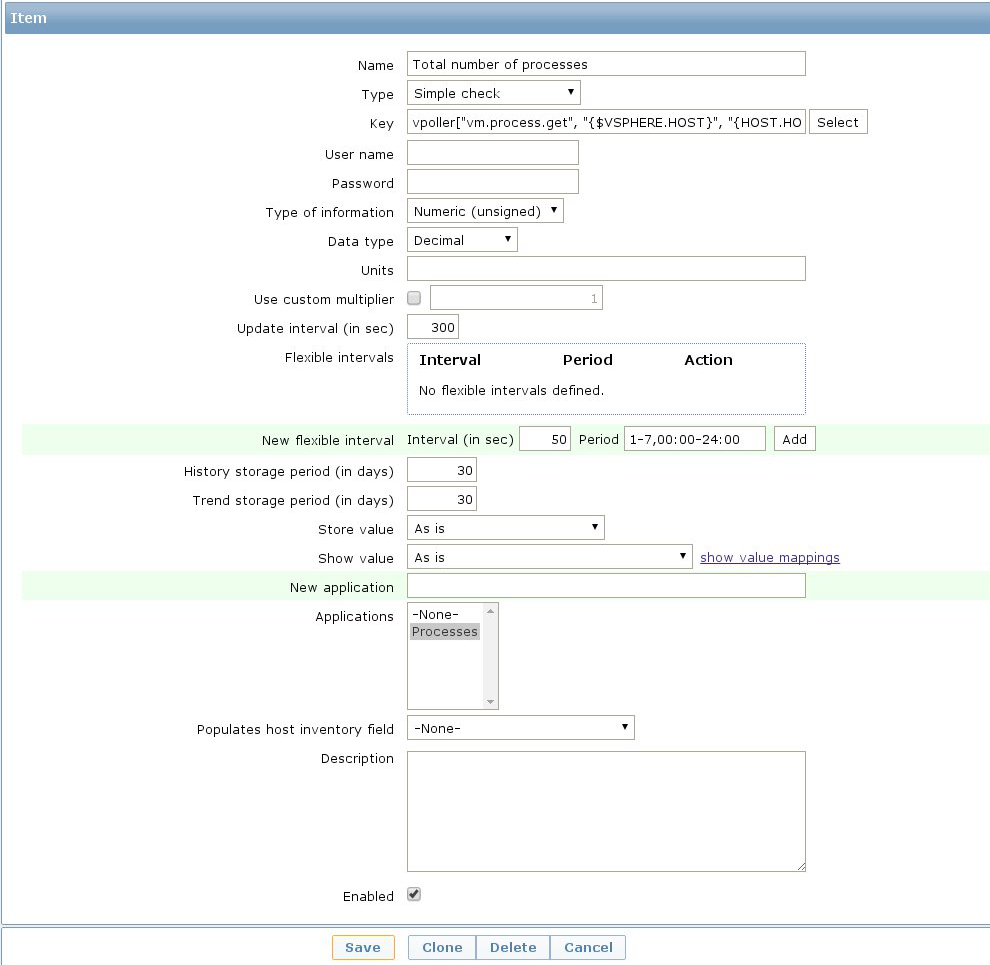 The key that we’ve used for monitoring the total number of processes
in our guest system is this:
The key that we’ve used for monitoring the total number of processes
in our guest system is this:vpoller["vm.process.get", "{$VSPHERE.HOST}", "{HOST.HOST}", "cmdLine", "", root, p4ssw0rd]
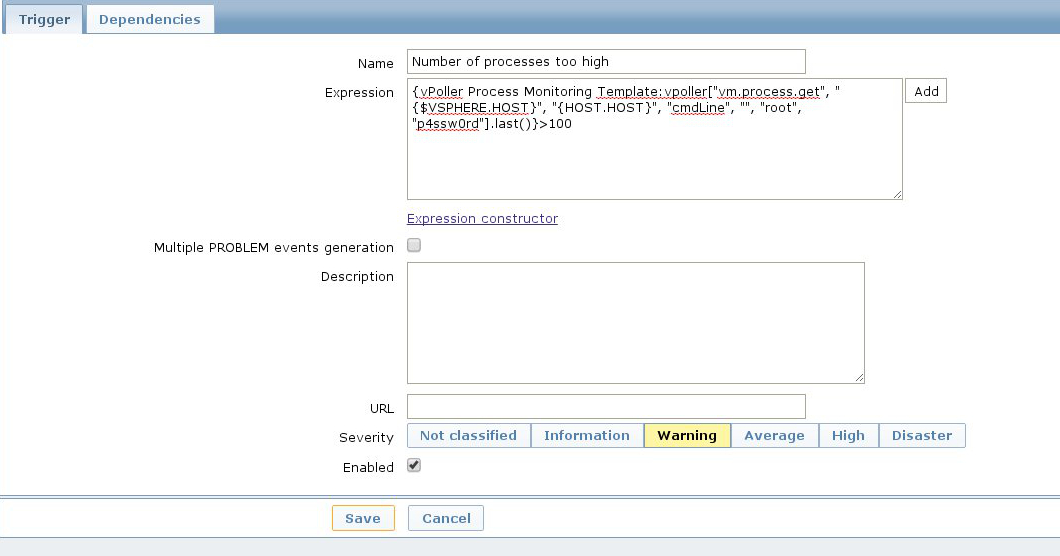 Now, let’s add a second item which this time will be monitoring the
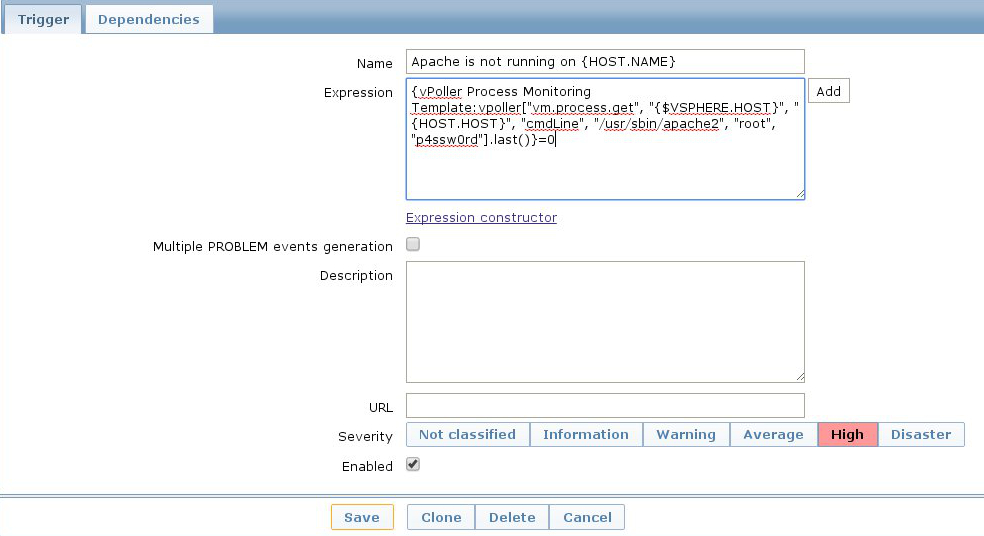
number of Apache processes in our Virtual Machine.
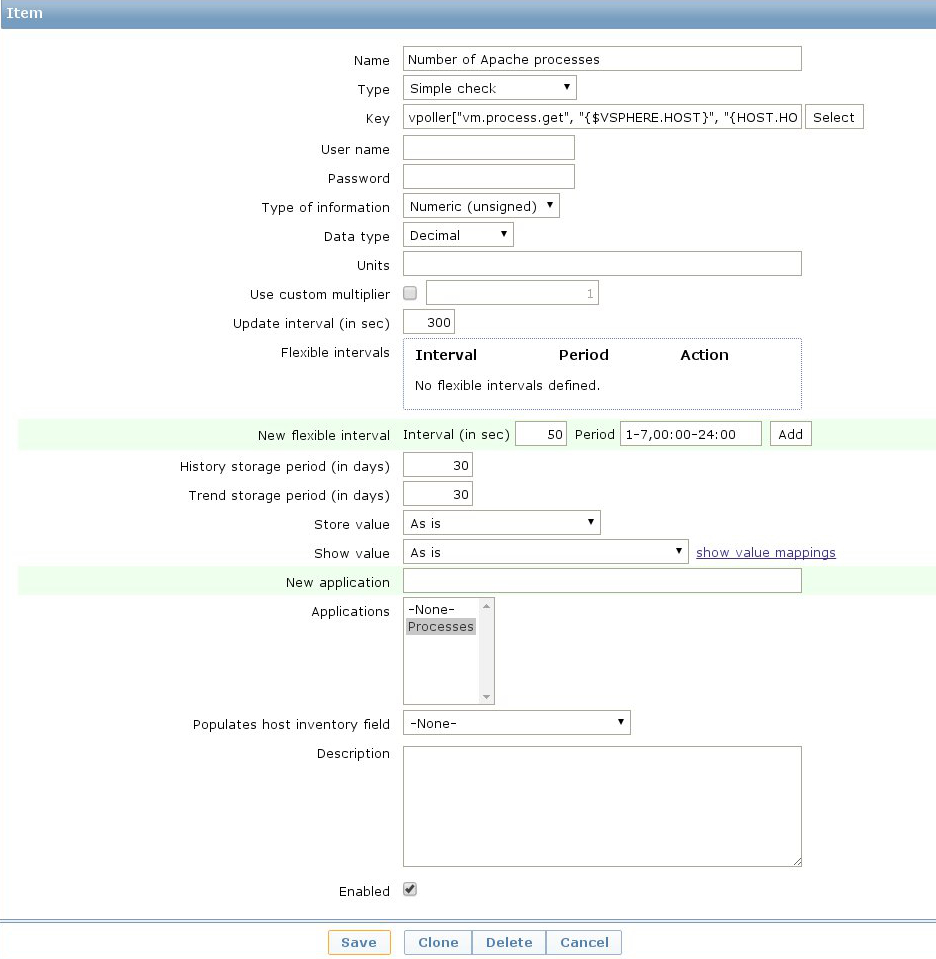 On the screenshot above we have used the following
Zabbix key in order to monitor the number of Apache processes in our
Virtual Machine.
On the screenshot above we have used the following
Zabbix key in order to monitor the number of Apache processes in our
Virtual Machine.vpoller["vm.process.get", "{$VSPHERE.HOST}", "{HOST.HOST}", "cmdLine", "/usr/sbin/apache2", root, p4ssw0rd]
Note
It is recommended that you use a system account with restricted
set of privileges when you perform agent-less process monitoring
with vPoller and Zabbix.You may also want to consider creating a global Zabbix macro for the system account username and password and use it in your Zabbix keys, without having the need to include the username and password in every single process-monitoring item that you want to have.
Global macros in Zabbix can be created by navigating to
Administration -> General -> Macros in your Zabbix Dashboard.zabbix_get(8) tool.Here’s how to query the total number of processes in a Virtual Machine from the command-line:
$ zabbix_get -s 127.0.0.1 \
             -p 10050 \
             -k 'vpoller[vm.process.get, vc01.example.org, vm01.example.org, cmdLine, "", root, p4ssw0rd]'
zabbix_get(8):$ zabbix_get -s 127.0.0.1 \
-p 10050 \
-k 'vpoller[vm.process.get, vc01.example.org, vm01.example.org, cmdLine, "/usr/sbin/apache2", root, p4ssw0rd]'
Example screenshots
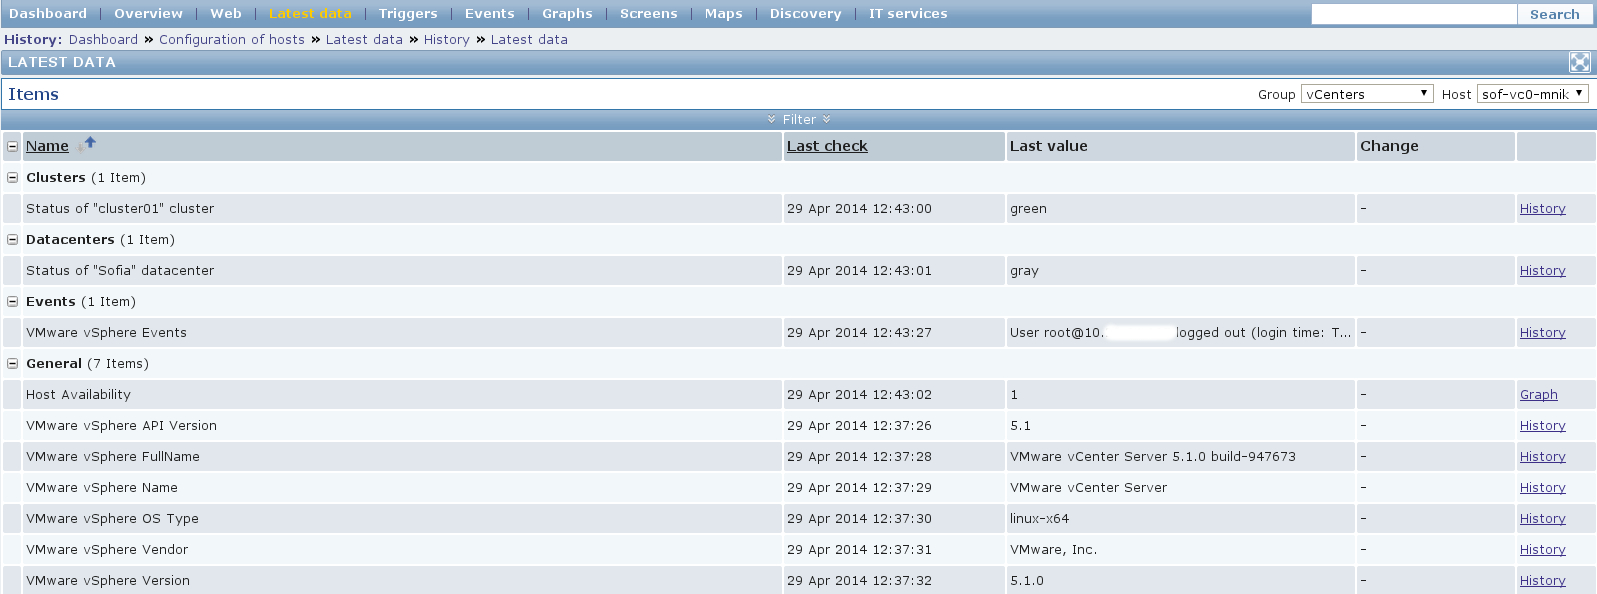
Let’s see some example screenshots of Zabbix monitoring a VMware vSphere environment using vPoller.Checking the latest data of our vCenter server in Zabbix:
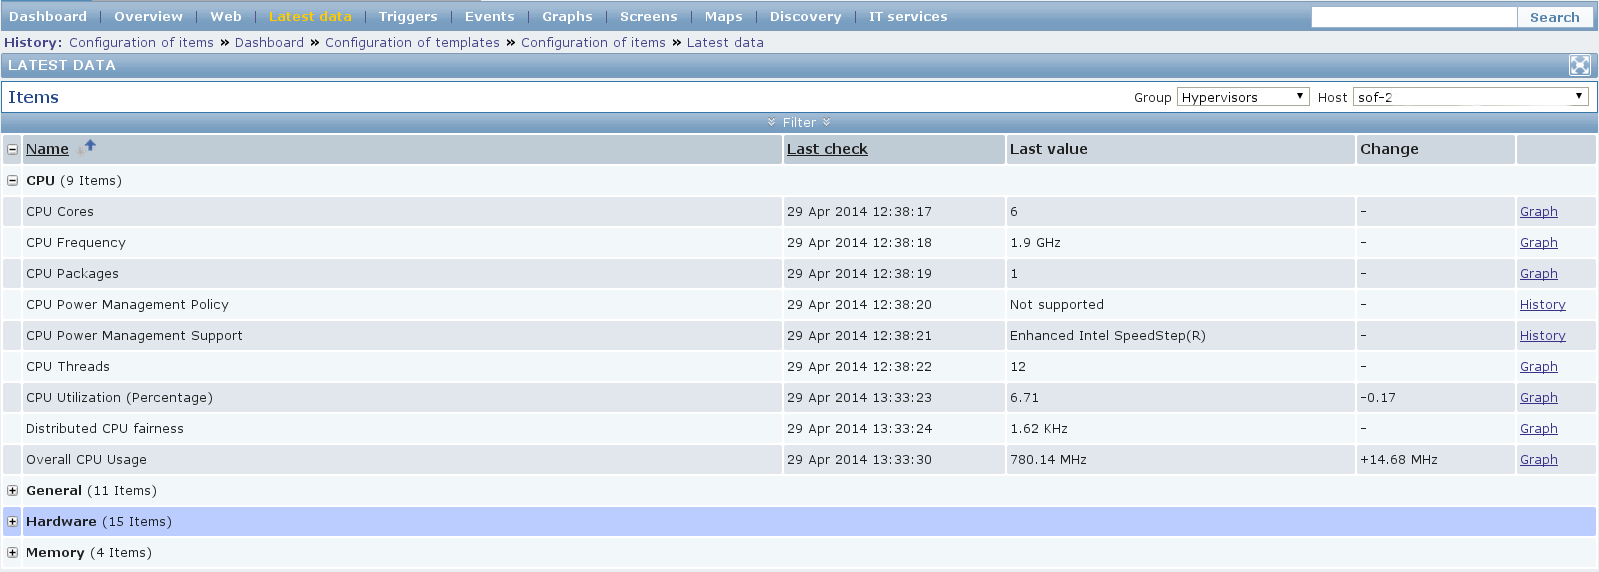
 Let’s see the latest data for some of our ESXi hosts:
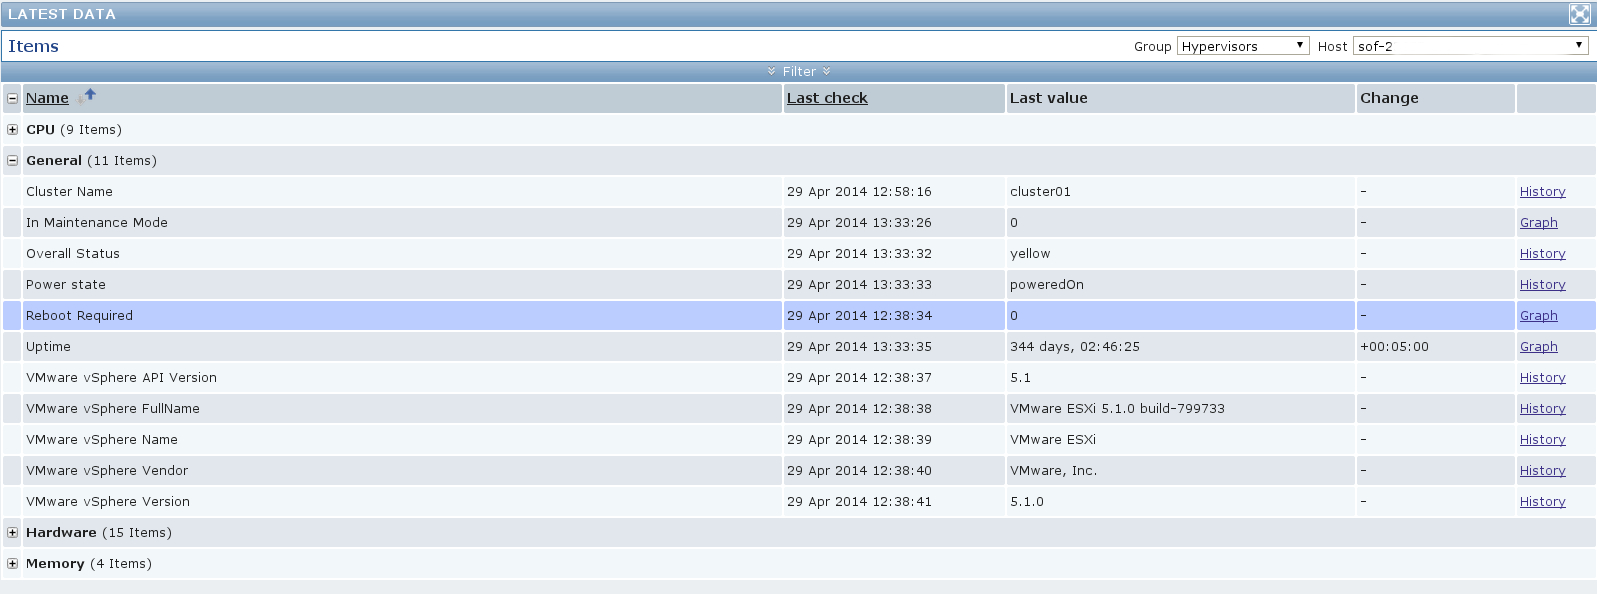
 Another screenshot showing information about our ESXi host:
 And another screenshot showing hardware related information about
our ESXi host:
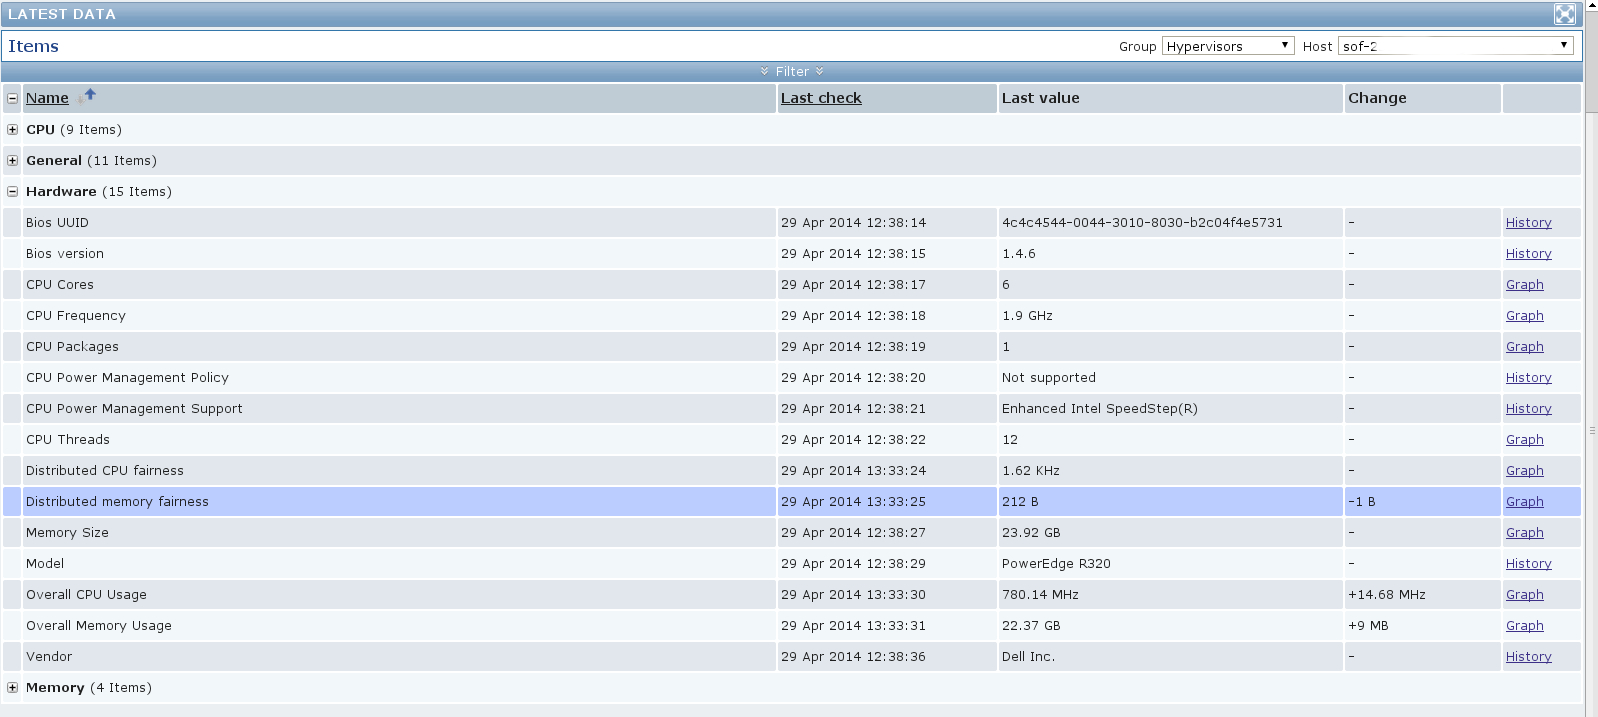 Let’s check the latest data for one of our Virtual Machines:
 A screenshot showing information about the file systems in
Virtual Machine:
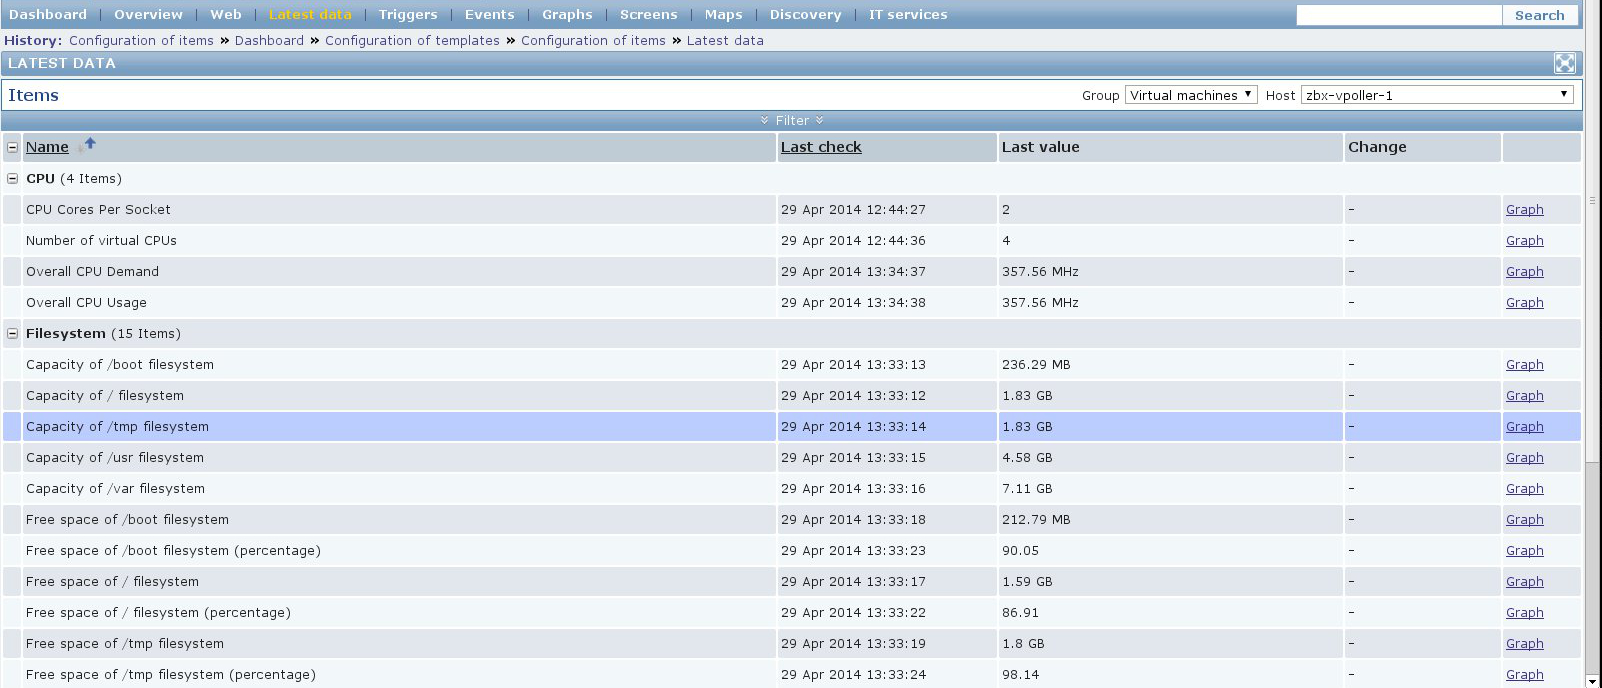 Another screenshot showing general information about a Virtual
Machine:
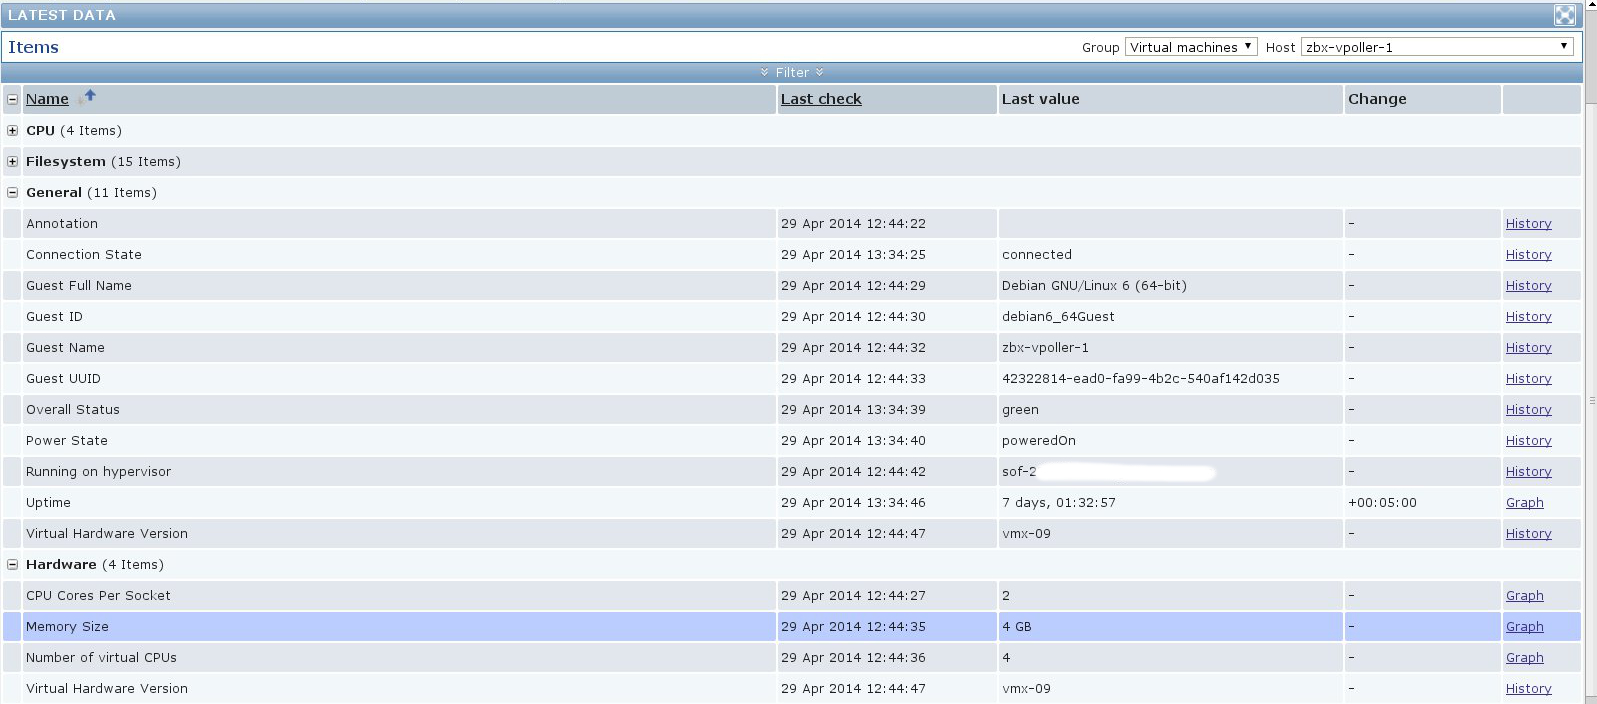 Another screenshot showing information about the memory and
VMware Tools for our Virtual Machine:
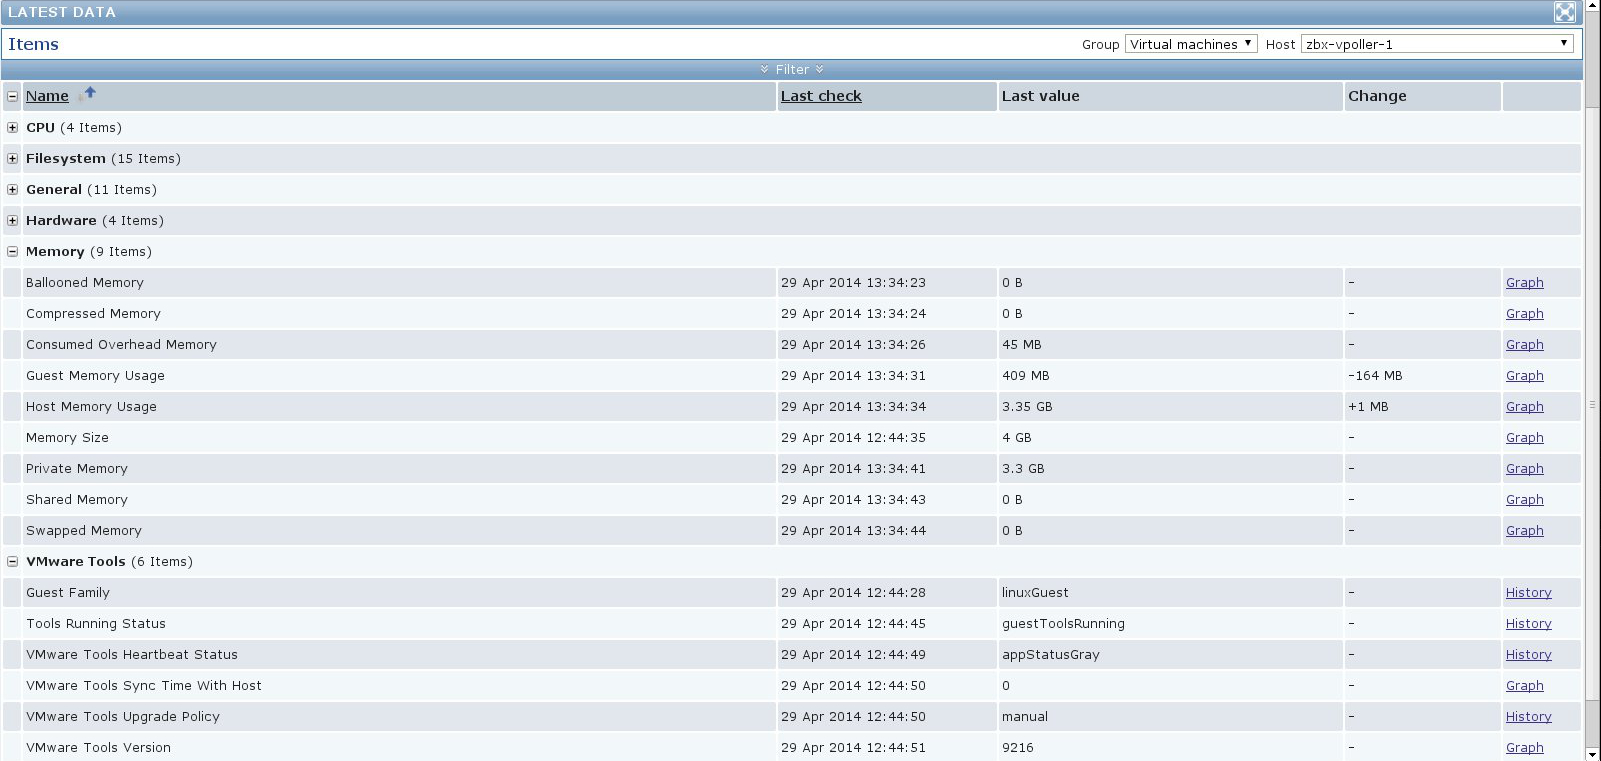 On the screenshot below you can see the discovered triggered alarms
for one of our vSphere Datacenters:
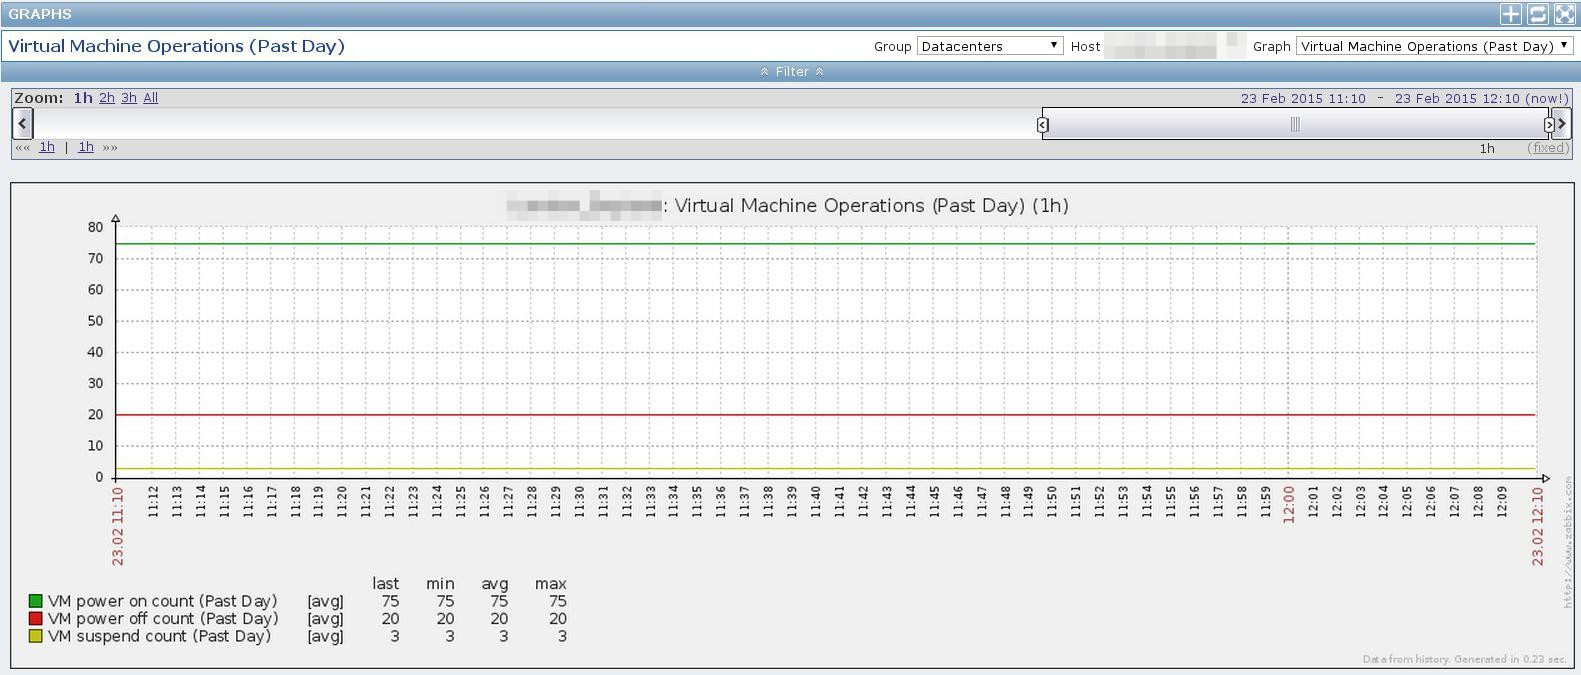
 The screenshot below shows the Virtual Machine operations for the
past day for one of our VMware vSphere Datacenters:
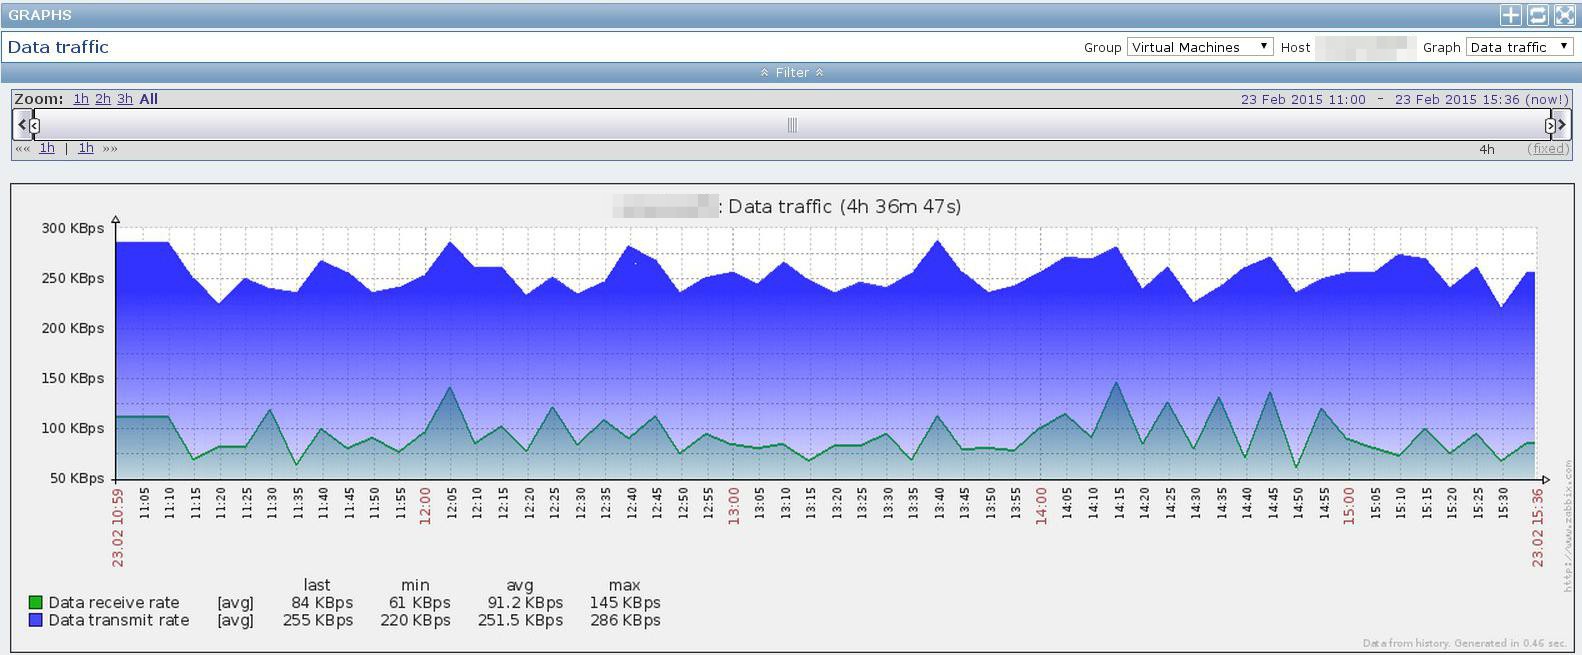
 From the screenshot below we can see the data traffic for one of
our Virtual Machines.
Comments
Post a Comment