First I will explain the methodology to install the samba with the anonymous sharing. To install samba run,
Now to configure samba edit the file /etc/samba/smb.conf before making changes I will make the backup of original file as /etc/samba/smb.conf.bak
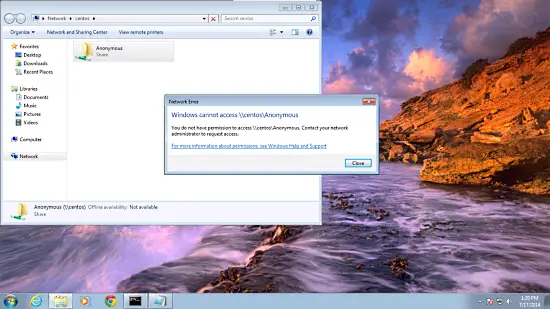
From a windows machine just browse the folder and try to create a text file, but you will get an error of permission denied.

Check the permission for the shared folder.

You can cross check the content at server also.

You will again face the issue of permissions to give write permission to the user srijan do:
Now samba users have the permissions to write into the folder. Cheers, you have done with samba server in CentOS 7.0 :)

# yum install samba samba-client samba-common
It will install samba with Version 4.1.1.Now to configure samba edit the file /etc/samba/smb.conf before making changes I will make the backup of original file as /etc/samba/smb.conf.bak
# mv /etc/samba/smb.conf /etc/samba/smb.conf.bak
Further give the entries like this
# vi /etc/samba/smb.conf
[global]
workgroup = WORKGROUP
server string = Samba Server %v
netbios name = centos
security = user
map to guest = bad user
dns proxy = no
#============================ Share Definitions ==============================
[Anonymous]
path = /samba/anonymous
browsable =yes
writable = yes
guest ok = yes
read only = no
# mkdir -p /samba/anonymous
# systemctl enable smb.service
#systemctl restart smb.service
Further CentOS 7.0 Firewall-cmd will block the samba access, to get rid of that we will run:# systemctl enable smb.service
#systemctl restart smb.service
firewall-cmd --permanent --zone=public --add-service=samba
[root@server1 ~]# firewall-cmd --permanent --zone=public --add-service=samba
success
[root@server1 ~]#
firewall-cmd --reload
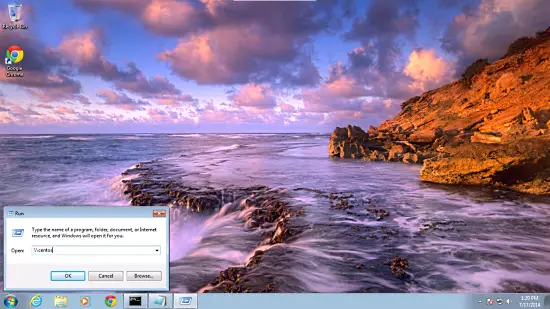
[root@server1 ~]# firewall-cmd --reload
success
[root@server1 ~]#
Now you can access the Centos 7.0 sharing in windows as follows, go to the Run prompt and type \\centos:
\\centos

From a windows machine just browse the folder and try to create a text file, but you will get an error of permission denied.

Check the permission for the shared folder.
# ls -l
drwxr-xr-x. 2 root root 6 Jul 17 13:41 anonymous
[root@server1 samba]#
[root@server1 samba]#
To allow anonymous user give the permissions as follows:
# cd /samba
# chmod -R 0755 anonymous/
# chown -R nobody:nobody anonymous/
# chown -R nobody:nobody anonymous/
# ls -l anonymous/
total 0
drwxr-xr-x. 2 nobody nobody 6 Jul 17 13:41 anonymous
[root@server1 samba]#
Further, we need to allow the SELinux for the samba configuration as follows:drwxr-xr-x. 2 nobody nobody 6 Jul 17 13:41 anonymous
[root@server1 samba]#
chcon -t samba_share_t anonymous/
Now anonymous user can browse & create the folder contents.
You can cross check the content at server also.
# ls -l anonymous/
total 0
-rwxr--r--. 1 nobody nobody 0 Jul 17 16:05 anonymous.txt
[root@server1 samba]#
-rwxr--r--. 1 nobody nobody 0 Jul 17 16:05 anonymous.txt
[root@server1 samba]#
3. Secured samba server
Therefore, I will create a group smbgrp & user srijan to access the samba server with proper authentication.
# groupadd smbgrp
# useradd srijan -G smbgrp
smbpasswd -a srijan
[root@server1 samba]# smbpasswd -a srijan
New SMB password:<--yoursambapassword
Retype new SMB password:<--yoursambapassword
Added user srijan.
[root@server1 samba]#
Now create the folder with the name secured in the /samba folder and give permissions like this:
mkdir -p /samba/secured
Again we will have to allow to listen through SELinux:
cd /samba
chmod -R 0777 secured/
chcon -t samba_share_t secured/
chmod -R 0777 secured/
chcon -t samba_share_t secured/
Again edit the configuration file as :
vi /etc/samba/smb.conf
[...]
[secured]
 path = /samba/secured
 valid users = @smbgrp
 guest ok = no
 writable = yes
 browsable = yes
systemctl restart smb.service
systemctl restart nmb.service
Further check the settings as follows
testparm
[root@server1 samba]# testparm
Load smb config files from /etc/samba/smb.conf
rlimit_max: increasing rlimit_max (1024) to minimum Windows limit (16384)
Processing section "[Anonymous]"
Processing section "[secured]"
Loaded services file OK.
Server role: ROLE_STANDALONE
Press enter to see a dump of your service definitions <--ENTER

[global]
 netbios name = CENTOS
 server string = Samba Server %v
 map to guest = Bad User
 dns proxy = No
 idmap config * : backend = tdb

[Anonymous]
 path = /samba/anonymous
 read only = No
 guest ok = Yes

[secured]
 path = /samba/secured
 valid users = @smbgrp
 read only = No
[root@server1 samba]#
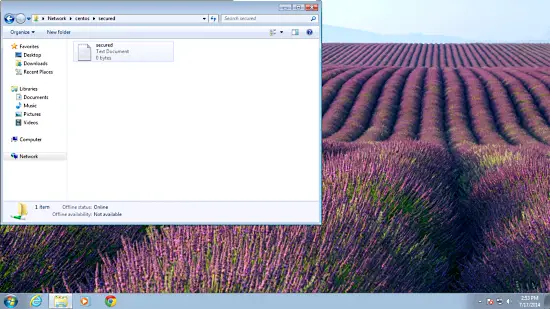
Now at windows machine check the folder now with the proper credentials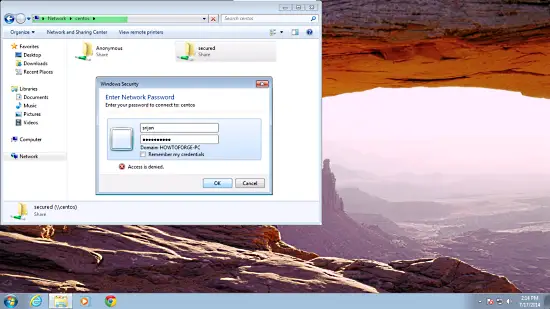
You will again face the issue of permissions to give write permission to the user srijan do:
cd /samba
chown -R srijan:smbgrp secured/
chown -R srijan:smbgrp secured/
Now samba users have the permissions to write into the folder. Cheers, you have done with samba server in CentOS 7.0 :)

Comments
Post a Comment